|
An Icehouse Pyramid Game Racing simulation for two to 33 players by Geoff Hanna |
- One tube/stash of Icehouse pyramids per player
- A pair of regular (six-sided) dice
- One race status mat (printable version attached)
- A race track (several printable tracks included) - or - extra pyramids or other materials to build a custom track
- A flat surface - if a white board, no need for track materials
To turn your car, rotate the pyramid one side without lifting it off of the surface. To turn right, rotate left, and vice versa.
Since "turn" means changing the direction of a car, the game is played in "rounds". A round consists of three movement phases followed by the "driver adjustment" phase.
|
||||||||||||||||||||||||||||||||||||||||||||||||||||
| Each gear has three speeds. Pyramid size increases with gearing but maneuverability decreases | ||||||||||||||||||||||||||||||||||||||||||||||||||||
At the end of the round - "driver adjustments" - the player may change speed or gears. Cars change one speed per round and must move through each speed before starting over in the next gear (backwards if downshifting).
A player may try to exceed normal performance during a turn, speed change or gear shift by rolling seven or higher on two dice - a "driver check". Each failed driver check reduces driver control.
A driver who is out of control spins out: speed goes to zero and an opponent randomly spins the pyramid in place. There are other ways to spin out too: leaving the track, being "bumped" by another driver, or worst of all, crashing, when the car must stay at speed zero for a rolled number of rounds.
|
The rest of this page contains rules for playing the basic game. This
represents racing at its most abstract and makes an enjoyable,
uncomplicated game. But if your tastes run to greater detail and richer
realism, consider Pyramid Gran Prix expansion sets.
It is important to understand the basic rules, but it is not necessary to start out by playing a basic game. Each of the expansions contain elements that can be mixed and matched to create your own ideal racing simulation. |

|
Daytona Introduces pit stops, damage, and enhanced car tracking statistics |
|
Monaco Pit crews, fuel, tire choices, car tuning, and enhanced driver statistics | |

|
Indy Add a whole new layer of strategy and variety with Pyramid Gran Prix Event cards | |
|
Circuit Several pre-designed tracks and campaign rules. Go for the Circuit Cup! | |

|
Badlands Scoundrels, matinee idols and damsels in distress vie with a variety of dirty tricks and foils (not quite as serious) |
| Custom Track Design | |
|
When laying out your own course,
start by determining the shape of the track. Is it a high-speed oval? Is it a windy
road course? How long do you want a lap to take?
There are some general guidelines:
Once you have a shape you must represent it as a play field. This is very easy if your racing surface is a large whiteboard or other erasable marker-friendly surface. In the absence of a drawable table top, a variety of different materials can be used to indicate what part of the table is "track" and what part is "not track". You can draw a track on multiple pieces of paper as is done in the Circuit expansion set. Masking tape works well too although it is time-consuming to lay and later, to clean up. The simplest option is to take unused pyramids, in pairs, each pair representing a gate that the cars must pass through. The more gates that are placed, the more clearly- defined the track. Illustrations in these rules assume the pyramid gate track method: clear pyramids mark the inner track line, while red pyramids mark the outside of the track. Don't forget the Start/Finish line! Walls Walls have a specific meaning: Usually, leaving the track results in a "spinout", but cars that impact a wall "crash". If you choose to include walls, insure they are clearly designated. Optionally, declare all outer track lines to be walls - but expect many crashes. |
The Circuit expansion set contains several pre-designed tracks that can be printed and taped together. The recommended course for a first ever Gran Prix is the Charlotte Motor Speedway, which can be printed here).
For some, the itch to create cannot be ignored. See the sidebar for custom track design tips.
Starting Methods
Choose one of three commonly-used starting methods:
Starting Line
Line all cars up in rows, two or three abreast depending on the track width, with the first row right on the starting line. All cars begin stopped - speed 0 - which means that no one will actually move during the first round.
Pace Car
Exactly the same as the Starting Line method except the cars are already in motion. All cars begin in Second Gear going speed 2.
Standing Start
Used in some endurance and road races, the drivers are not even in the cars. Each vehicle is lined up, single file, off the track but aimed towards it.
Each car must successfully make a driver check (roll seven or higher on two dice) to start their car at speed 0. Those who fail may check again in following rounds. Failing this driver check does not decrease Driver Control since the driver is not yet actually in the car.
Eight cars lined up for a standing start |
Pole Position
In an ideal world where each game may take infinite time, each driver makes one lap of the course and starting positions are determined by the fewest number of rounds needed to complete the lap. Ties are broken by: the earliest movement phase, and if still a tie, the faster speed as the car crossed the line.
In less ideal but more common worlds, roll the dice. The highest number gets the best position. Re-roll to break any ties.
In a Starting Line or Pace Car start, the best position is on the inside of the track in row 1, then the outside of the track in row 1, then the inside of row 2, etc.
|
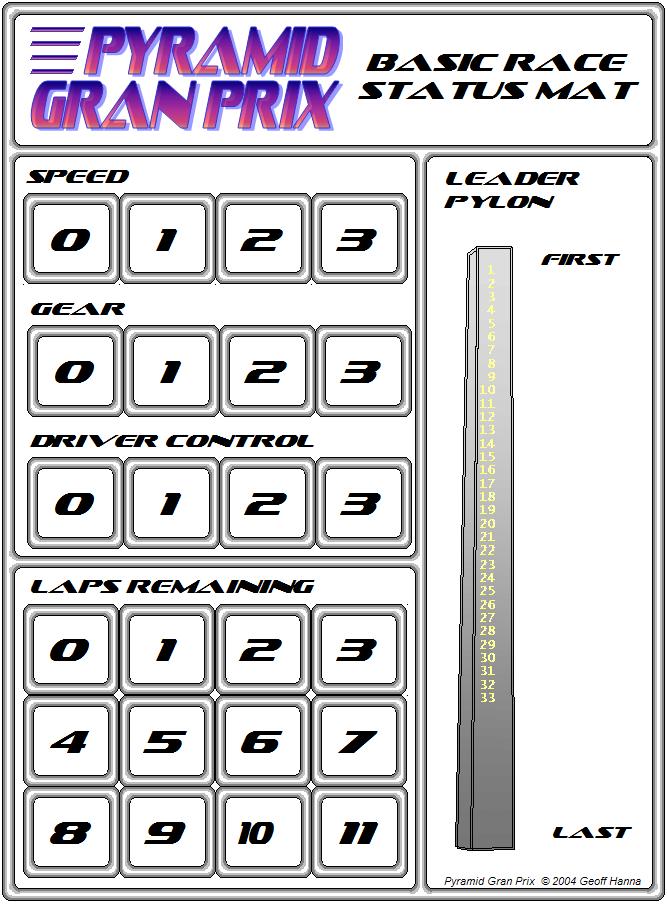
| Click for a printable version of this mat |
Each player provides five pyramids of their color to serve as status markers. Pyramid size is not important but everyone should save at least two pyramids of each size for game play.
Stack one pyramid of each color in the gear and speed indicated by the selected starting method (for Standing Starts, do not place speed or gear markers until the player succeeds at the first driver check).
Stack another pyramid of each color in Driver Control space 3.
Another stack goes into the Laps section. For a five-lap race, begin the stack in space 5.
The final pyramid is not stacked, but lined up in the Leader Pylon section in the order of each car's starting position, from first place to last.
Multiple Mats (when there are more cars than colors)
The race may contain more cars than there are separate pyramid colors.
For the cars themselves this is not much of a drawback. All players spend much of the time examining the track and it is not difficult to remember which car is which.
But the status markers are not so easily identified. To solve this problem, use more than one Basic Race Status Mat. The first Black car is tracked on the first status mat, the second Black car on the second mat, and so on.
Note that everyone must share one Leader Pylon: you will need to identify same-colored pyramids by size or some other method such as tape on one of the pyramids.
The leader pylon at Indy |
Reorder the Leader Pylon on the Race Status Mat from current first place to last.
In case of a tie, the inner car is leading. If still too close to call, but one car will block the other if not moved, the blocking car is the leader.
Movement - General
There are three movement phases. In each phase, eligible cars first move one car length forward. If the car is eligible to turn in this phase, turning always happens AFTER movement.
If any part of the car crosses the finish line during any movement, decrease the car's Laps Remaining status marker by one. If the just-complete lap was lap 0, the player wins.
Each movement Phase is resolved in the order of the Leader Pylon: the first place car moves, then turns. Then the second place car moves and turns. Etc.
To move a car, place another same-size pyramid directly in front of the current car, pointing the same direction, and then pick up the original car.
To turn, rotate the pyramid one side without lifting it off of the surface. To turn right, rotate left, and vice versa.
See the Movement and Turning Diagram for a detailed car movement illustration.
General movement rules:
- If a car may move during a phase, it must do so
- A car may not turn until after it has moved
- A car that is not eligible to move is not eligible to turn either (regardless of pyramid size)
- Turning is always optional
- Turns may not be "saved up" from one movement phase to another. Use it or lose it.
| Who must move | Who may turn | |
| Phase 1 | All cars not Stopped | All cars not Stopped |
| Phase 2 | Cars at speed 2 or 3 | Cars in First or Second Gear |
| Phase 3 | Cars at speed 3 | Cars in First Gear |
| Movement and Turning Example | ||
|
||
In this step-by-step example, a car in First Gear going speed 3 makes a hard
left turn. Since it is going speed 3, it must move forward each phase.
Since it is in First Gear, it may turn in each phase, after each move forward.
Movement Phase 2 Movement Phase 3 |
||
|
The concept of a spin out is very simple: an opponent reaches over and spins the car, twisting it in place between thumb and forefinger rapidly and randomly. The goal of the spin is not to throw the car - rather, the opponent makes a best effort to spin the heck out of the car but mostly leave it in place. If the pyramid ends upright, replace and re-spin. In spite of the opponent's attempt to spin the car in place, it will likely move an inch or two or even more. That is just one of the random effects of a spin out. The spinning car may impact other cars too, jumbling them about and pointing them in undesirable directions. So it goes in the high stakes world of pyramid racing. When choosing the opponent to do the spinning, those that do not have cars in the general area should get preference. In addition to being spun, the car that spins out is also set to no Gear and speed 0. Regular activity resumes during the first driver adjustments AFTER the waiting period has passed: it is possible that more movement phases than the rolled number will actually be missed. A crashed car remains where it is and can be crashed into again: the original waiting period immediately ends and a fresh one is rolled anew. |
A car that is in First Gear may already turn in every movement phase. But what of a driver seeing a looming wall when not in First Gear?
Any car that moves during a movement phase may also attempt to turn even when otherwise ineligible. To make this attempt, roll a "driver check" - seven or higher on two dice.
If successful, the player may turn the car. If the check fails, the player may not turn the car and in addition, the player's Driver Control status marker decreases by one. If the marker reaches space 0, the car is out of control and immediately spins out.
Movement - Leaving the Track
A poorly planned turn, a failed driver check, or an unexpected bump may cause a car to find itself off the the track.